Here is our vlog where we discuss the feedback that we received at our media showcase:
Showing posts with label Vlog. Show all posts
Showing posts with label Vlog. Show all posts
Wednesday, 23 March 2016

Friday, 4 March 2016
Audience Feedback
Today we received audience feedback on the final draft of our music video. We wanted feedback on what we could improve, such as lip-synching, however, it appeared that the class enjoyed the music video and they didn't offer any recommendations for improvement. As a group we are still noticing small details with the lip-synching that others don't seem to see or hear, this has lead to us spending more time perfecting the lip-synching but it has also become a form of procrastinating uploading our video. Receiving such positive feedback has finally given us the push to add the finishing details, such as the music video title, and then upload the video to YouTube.
Here is our feedback vlog:
Here is our feedback vlog:
Wednesday, 2 March 2016
Finished Editing
Today we finally finished editing our music video. We are planning on getting some audience feedback before we upload our video as we need objective opinions so that we can see what we may need to improve. We mostly need to see whether the lip-synching of our video is correct. Once we have received feedback and made small changes we will need to add the music video title and artist name at the start.
Here is our vlog from today:
Here is our vlog from today:
Wednesday, 17 February 2016
Capel Manor Filming
Today we finally filmed at the Capel Manor Maze, marking the completion of filming our music video. This was an incredibly important location as it helps to make the narrative clearer, with themes of escapism being shown by the performer being 'trapped' in a maze. Unbeknownst to us, there were other interesting locations on the Capel Manor grounds that we discovered whilst trying to find the maze. These included a variety of gardens and an derelict church. Due to the weather, the gardens were not suitable for filming as they appeared dull and dead, however, we decided to film in the church as its decaying exterior reflects the deteriorating mind-set of our protagonist, adding further symbolism to our music video. Overall, I am really please with our footage and am excited to continue editing our video with our new shots, which will, hopefully, make the video flow better.
Here is our vlog from the shoot:
Here is our vlog from the shoot:
Wednesday, 10 February 2016
Wednesday, 27 January 2016
Editing Progress Vlog
Here is our vlog from today where we talk about the progress we have made with our editing:
Monday, 18 January 2016
Spiral Staircase Filming
Today we filmed in a car park on Oxford Street as it contained the spiral staircase that we needed for a particular shot. We went in the evening as this was a less busy time, allowing us to film more easily with little disruptions. We wanted to film the staircase as its spiral shape enforces the idea of 'hypnotism' linking the visuals of our music video to the lyrics of the song. The location also helped us to portray our narrative of escaping as the protagonist, played by me, can be seen desperately running up the stairs, the spiral aspect making it seem as though her hopes are in vain as the staircase appears to have no end. The majority of our shots from previous locations were purely shots of the artist lip-synching, this made it difficult to start editing the footage as we were unable to show the narrative and the progression of the video. Today's shoot was extremely successful and we now have many shots that will help to tell the story of our music video, hopefully we will be able to edit the footage soon. We have one more location left, the Capel Manor Maze, we are planning to finish filming by the end of the week.

On the left is a shot looking up the staircase, capturing its spiral structure. I like the disorientated look of the shot due to the difficulty in distinguishing whether it is looking upwards or downwards, this mirrors the confused mindset of the character. By making the audience feel disorientated, they will be able to empathise with the protagonist on a greater scale.
Here is our vlog from the shoot:

On the left is a shot looking up the staircase, capturing its spiral structure. I like the disorientated look of the shot due to the difficulty in distinguishing whether it is looking upwards or downwards, this mirrors the confused mindset of the character. By making the audience feel disorientated, they will be able to empathise with the protagonist on a greater scale.
Here is our vlog from the shoot:
Saturday, 5 December 2015
Designing Our Digipak
After creating a general plan of the look we want for our Digipak, we began looking through our footage for suitable images. We found various images that we could use, we will create multiple Digipaks and evaluate the options in order to select the best Digipak.
We decided to start creating our Digipak, starting with the disc. We obtained a still image from our Camden shoot (below) of an ornate pattern on the side of a building. I like the bright colours and think that this will help the CD to stand out against the black and white background images. We used Photoshop to turn the shot into a circular shape, suitable for a disc.


We also experimented with the back cover. We selected a shot of our artist (me) in order to add to the 'star image', relating to Richard Dyer's theory as well as Andrew Goodwin's music video theory, both of which state that close ups of the artist help to enforce their 'brand'. We turned the image black and white and then added our tracklist. Initially, our tracklist was on the left of the image in a vertical list (below-left), however, we then realised that we hadn't cropped the image to the correct Digipak dimensions. After cropping it, we moved the text so that it was at the bottom of the image (below-centre) where it could be read more easily. We then experimented with different fonts and decided to add diamond shaped bullet points (below-right) to separate each track title so that each one stood our more.


Below is our vlog from today, showing our Digipak creation process:
We decided to start creating our Digipak, starting with the disc. We obtained a still image from our Camden shoot (below) of an ornate pattern on the side of a building. I like the bright colours and think that this will help the CD to stand out against the black and white background images. We used Photoshop to turn the shot into a circular shape, suitable for a disc.


We also experimented with the back cover. We selected a shot of our artist (me) in order to add to the 'star image', relating to Richard Dyer's theory as well as Andrew Goodwin's music video theory, both of which state that close ups of the artist help to enforce their 'brand'. We turned the image black and white and then added our tracklist. Initially, our tracklist was on the left of the image in a vertical list (below-left), however, we then realised that we hadn't cropped the image to the correct Digipak dimensions. After cropping it, we moved the text so that it was at the bottom of the image (below-centre) where it could be read more easily. We then experimented with different fonts and decided to add diamond shaped bullet points (below-right) to separate each track title so that each one stood our more.


Below is our vlog from today, showing our Digipak creation process:
Friday, 27 November 2015
Brick Lane Filming
Today we filmed Brick Lane. We wanted a shot of our artist (played by me) in front of a graffiti wall. We were unable to find the particular wall that we wanted, however, we were able to find other suitable locations. We wanted as bright a wall as possible in order to contrast the white outfit that I was wearing, we also wanted this location to contrast Camden as much as possible - the bright, vibrant colours of Brick Lane compared to the dark, night-time shots of Camden. Whilst we wanted these locations to contrast each other with their distinct styles, we wanted some common elements, for example, we wanted both locations to have a 'grungy', neglected look that helps to symbolise the disorientated mind-set of the character in the music video. We also managed to find graffiti (below) that was in keeping with our previous colour palettes, the contrast of the orange and blue similar to the lighting by the Camden river as well as the light filters used in the studio, thus tying all of our locations together.
 We filmed some impromptu, unstoryboarded shots after seeing an interesting location (below). We were drawn to this doorway because of its particularly dilapidated state. I feel that the torn paper and grimy bricks help to add interesting textures that capture the atmosphere of the location whilst also mirroring the protagonist's deteriorating emotions as she tries to escape. It has also added to the feeling of being trapped as I am standing in a corner with my hands against the walls, appearing boxed in.

We continued the theme of being trapped by filming in front of this graffiti (below) that had two perpendicular walls extending out towards the camera, again, creating a boxed in effect. We liked the leaves on the floor as they added to the overall decayed feel of the location and, again, help to establish the colour palette - the orange leaves and blue graffiti.

We managed to get a successful tracking shot (below) that we had previously planned. We filmed this by hand, this has lent an intentional unsteady look to the shot. We didn't want the shot to be completely smooth as we wanted to mirror the rough look of the location. The unsteady shot also helps to mimic my movement as I walk towards the camera, making the shot appear natural and unstaged.

Below are some behind the scenes photographs from the shoot:


Here is our vlog where we talk in more depth about the events of the day:


We continued the theme of being trapped by filming in front of this graffiti (below) that had two perpendicular walls extending out towards the camera, again, creating a boxed in effect. We liked the leaves on the floor as they added to the overall decayed feel of the location and, again, help to establish the colour palette - the orange leaves and blue graffiti.

We managed to get a successful tracking shot (below) that we had previously planned. We filmed this by hand, this has lent an intentional unsteady look to the shot. We didn't want the shot to be completely smooth as we wanted to mirror the rough look of the location. The unsteady shot also helps to mimic my movement as I walk towards the camera, making the shot appear natural and unstaged.

Below are some behind the scenes photographs from the shoot:


Here is our vlog where we talk in more depth about the events of the day:
Friday, 6 November 2015
First Day of Filming
We had originally planned to film in Brick Lane today, unfortunately, due to an issue with the dispatcher, our costume that we ordered has not arrived yet. In order to stay on schedule and not waste the day, we decided to film our studio shots as this is an easily accessible location. Inspired by the video for Calvin Harris' 'How Deep is Your Love', we wanted close up shots of our protagonist with flashing, strobe-like coloured lighting against a black background.
In preparation for the shot, we had to set up a black screen and adjusting its height by balancing it on some chairs in order for it to be tall enough to fill the frame. We turned off the lights in the room to make the background as dark as possible, however, this meant that it was too dark for me to be visible on camera. To overcome this we attached a light to the camera and adjusted the brightness until we were happy with the results. We used multiple coloured filters on a separate handheld, battery powered light to achieve the desired effect. Whilst filming, we played our song,' Hypnotic', out loud so that I could lip synch in time as well as for us to change the colour of the light with the beat of the music.
We were successful in obtaining the required shots so we decided to upload the footage and practise editing it on iMovie. This gave us an idea of what effects we could do on iMovie and also helped us to understand the difficulty of synching the song precisely.
Here is our behind the scenes vlog from the shoot:
In preparation for the shot, we had to set up a black screen and adjusting its height by balancing it on some chairs in order for it to be tall enough to fill the frame. We turned off the lights in the room to make the background as dark as possible, however, this meant that it was too dark for me to be visible on camera. To overcome this we attached a light to the camera and adjusted the brightness until we were happy with the results. We used multiple coloured filters on a separate handheld, battery powered light to achieve the desired effect. Whilst filming, we played our song,' Hypnotic', out loud so that I could lip synch in time as well as for us to change the colour of the light with the beat of the music.
We were successful in obtaining the required shots so we decided to upload the footage and practise editing it on iMovie. This gave us an idea of what effects we could do on iMovie and also helped us to understand the difficulty of synching the song precisely.
 |
| Costume - Choosing makeup |
 |
| Marking position |
 |
| Setting up the camera |
 |
| Framing the shot |
 |
| Filming |
 |
| Uploaded footage |
 |
| Editing on iMovie |
 |
| Editing on iMovie |
Here is our behind the scenes vlog from the shoot:
Friday, 9 October 2015
Storyboarding
We started storyboarding our music video today, below is a vlog where I explain the process:
Last year, our storyboard wasn't particularly detailed, this made it harder for us to follow and we ended up changing various aspects as it wasn't planned out thoroughly. I think that this year we will need to spend more time storyboarding so that way we have a clear plan of what shots we need when we go out to shoot, this will make filming easier and less time consuming. As we are creating a music video, there will need to be a lot more camera movement to match the energetic atmosphere of the song, this is something that we hadn't thought about or storyboarded last year. Below are some photographs of the group storyboarding:


Last year, our storyboard wasn't particularly detailed, this made it harder for us to follow and we ended up changing various aspects as it wasn't planned out thoroughly. I think that this year we will need to spend more time storyboarding so that way we have a clear plan of what shots we need when we go out to shoot, this will make filming easier and less time consuming. As we are creating a music video, there will need to be a lot more camera movement to match the energetic atmosphere of the song, this is something that we hadn't thought about or storyboarded last year. Below are some photographs of the group storyboarding:
Lip Synching Practise - Audience Feedback
We decided to get some audience feedback on our lip synching practise video. I think that this was beneficial in order to gain an unbiased opinion on our lip synching and editing abilities.
Wednesday, 7 October 2015
Lip Synching Practise Vlog
Here is a group vlog from today evaluating our lip synching practise video:
Friday, 25 September 2015
Pitch - Audience Feedback
After pitching our ideas for our music video, we asked the class to write down any comments or questions that they had. By doing this, we now know what elements worked well and what needs to be made clearer and any improvements that need to be made in general.

Below is a vlog in which we respond to the feedback:

Below is a vlog in which we respond to the feedback:
Friday, 18 September 2015
Tuesday, 14 July 2015
Prelim Evaluation
We experienced a few difficulties when producing our prelim. As previously stated in another post (Filming for Prelim), the dance routine was probably the most difficult aspect of the prelim. I also found that editing was harder than I had expected, it was quite time consuming trying to edit to the beat as well as matching the lip-synch correctly. Towards the end of the prelim, at around 00:28, the lip-synch is slightly off, which is very distracting for the audience, for our final music video we will spend more time carefully editing to ensure that this mistake is not repeated. I also think that it would be helpful if we didn't include as much performance, this would cut down on the amount of lip-synching required.
 Unlike the original video, we filmed outside of the school instead of on the street, this was for practical reasons, it would have been too busy to film in public, this would have made it harder to obtain the required shots. For our final music video, we would need to pay closer attention to our mise-en-scene to ensure that it is relevant to the chosen song and genre, thereby creating a more professional-looking video.
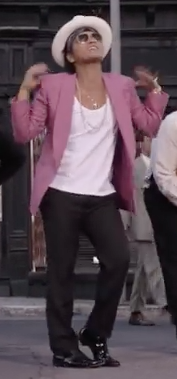
Whilst the setting was very different, we wanted our costumes to be as similar as possible. We put a lot of effort into our outfits and I am quite proud of the results. The best costume, in my opinion, was Janadhi's (below left) as she had an almost identical blazer. For the other costumes, we had to compromise and substitute certain items, for example, we didn't have black or white blazers so, instead, we wore other items of clothing but in the same colours (below right) so that it was clear which characters we were portraying.


We managed to match Jane to Bruno Mars almost perfectly (hat, chain, sunglasses) with the exception of the pink blazer.


I think that costume is an extremely important element of a music video as it helps to set the tone, for example, bright colours for an upbeat song, like our prelim, and darker colours for a sadder song. We will continue this attention to detail in our final music video.
Below is a vlog showing audience reactions to our prelim. I thought that this was helpful as I could listen to criticisms from an outside perspective to see how others thought we could improve.
 Unlike the original video, we filmed outside of the school instead of on the street, this was for practical reasons, it would have been too busy to film in public, this would have made it harder to obtain the required shots. For our final music video, we would need to pay closer attention to our mise-en-scene to ensure that it is relevant to the chosen song and genre, thereby creating a more professional-looking video.
Whilst the setting was very different, we wanted our costumes to be as similar as possible. We put a lot of effort into our outfits and I am quite proud of the results. The best costume, in my opinion, was Janadhi's (below left) as she had an almost identical blazer. For the other costumes, we had to compromise and substitute certain items, for example, we didn't have black or white blazers so, instead, we wore other items of clothing but in the same colours (below right) so that it was clear which characters we were portraying.


We managed to match Jane to Bruno Mars almost perfectly (hat, chain, sunglasses) with the exception of the pink blazer.

I think that costume is an extremely important element of a music video as it helps to set the tone, for example, bright colours for an upbeat song, like our prelim, and darker colours for a sadder song. We will continue this attention to detail in our final music video.
Below is a vlog showing audience reactions to our prelim. I thought that this was helpful as I could listen to criticisms from an outside perspective to see how others thought we could improve.
Prelim Vlog
We finally finished our prelim today! We had to refine the editing slightly so that the lip synching was correct and that everything looked as smooth and seamless as possible. Here is our vlog where we reflect on the prelim production process:
Subscribe to:
Posts (Atom)